Category: DIY
Showing posts with label DIY. Show all posts

Stampin' Up! UK Card Making Kit

Friday, September 09, 2016
Stampin' Up Card Making Kit
Earlier in the year, I reviewed the Watercolour Wishes Card Making Kit from Stampin' Up! UK which I loved! It's such a comprehensive, cute and easy to use kit so I was super excited when I received another kit. I have the *Oh Happy Days Card Making Kit (£31.50) which contains: stamp ink, a stamp block, stamps, glittery dots, twine, die cut white and gold shapes, embossed sheets, glittery wooden shapes, 20 card bases and envelopes and the cute storage box as well as instructions/card design ideas.

I love crafting and DIY projects but they always turn out a little different than I thought they would or the projects I want to try are quite time consuming or involve a lot of tools but making cards is such a quick, easy and relaxing craft project. I've already made four cards using only the products in the kit and I love how all of them turned out!
Stampin' Up Card Making Kit
The designs are so gorgeous and unlike some card making kits, so modern and pinterest worthy! I love the typography of the stamps, it's gorgeous. There are so many card designs you can make or you can come up with your own designs. I think for the amount of items you receive in the kit, it's well worth the money - it works out to be just over £1.50 per card and you then still have the extras and stamps to make more cards.

Overall, I can't recommend this kit enough; it's so quick and easy to use! You can make gorgeous, Etsy/Pinterest looking cards in a few minutes. They also have some christmas card kits and stamp which I need! Overall rating: ★★★★★, 5/5.

Have you tried anything from Stampin' Up! UK? What do you think of the cards I've made? 

#ThouShaltCraft ft. Viking

Saturday, April 23, 2016
April marks the 400th anniversary of Shakespeares death and the lovely people at Viking have created a challenge, to come up with some craft ideas around The Immortal Bard and I was more than happy to take part. I was kindly sent some products to help including a freakin' gorgeous calligraphy kit, Sharpie markers, paper and other products.
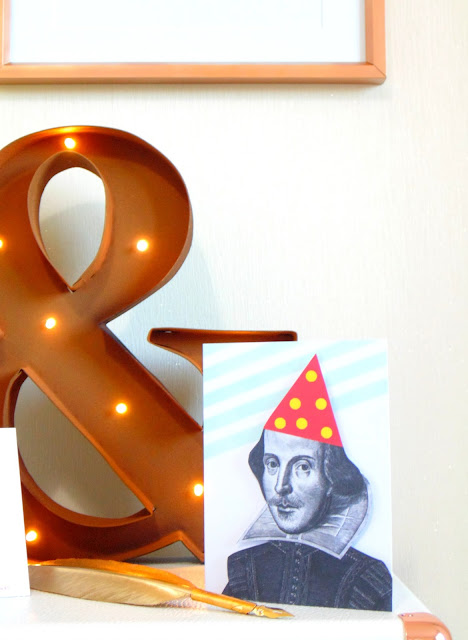
As much as I would like to think of myself as an amazing crafting blogger able to create incredible projects but sadly, I'm not. So I've stuck with the things I can do - prints and cards! The first item I made is a Shakespeare birthday card as you know, reasons. I found a royalty free image of Shakespeare, added a party hat and printed it so I could use foam stickers to attach it to a stripy card and hey presto, a birthday card. I used my Watercolour Card Making Kit. I have two family members that share a birthday with William Shakespeare and it's also St Georges Day, so one of them will get this card!
I also made this print 'Anatomy Of A Shakespearian Heart' that I'm kind of in love with! I again found a royalty free image of a medical drawing of a heart and I added annotations of the various lettered labels with Shakespeare's quotes around love and some of his other most famous quotes. I have this print taped to my 'feature' wall in my office (with cute stripy washi tape) and it looks great!

Here's a super short video to show the cards and print better:


What do you think of my Shakespeare inspired cards and print? 

DIY Marbled Clay Jewellery Holder

Wednesday, July 15, 2015
I'm always looking for crafting ideas but most of the time they end up looking completely different to what they should look like; however I read a post on the blog Lady Liquor VTG (here) about creating a ring dish out of clay and as I had some excess clay I thought I would give it a go. Mine is a bit...rustic but Catherine's came out beautifully!

To make a clay ring/jewellery dish you will need:

- Oven clay (I bought mine from Hobbycraft) 
- A cookie cutter or a knife
- Paper
- Rolling Pin
- A small circular cutter/pen lid (optional)
- A silicone cake/cupcake mould or a oven safe dish/bowl

Step One: Firstly you will need to lay out paper on a flat surface and tape it down gently so when you peal it off, it won't ruin the surface and remove your clay from it's packaging.

Step Two: Wash your hands (as bits from your hands can easily stick to the clay) and break up your clay. I am using a minty blue colour and a deep metallic copper so I rolled out the mint one first so it doesn't become muddy with the copper colour. Roll each colour you have into 2/3 long sausages. 

Step Three: Plait the sausages alternating the colours so the colours mix well and press into a rough ball shape. This will create the marbling effect which will be better the more colours you use. 

Step Four: Roll out the ball into a flat disc approx. 5mm (0.5cm) thick - you could make it a little thicker but if it is too thin the dish won't be as strong or durable. Rolling out the clay ball is difficult and if you roll and work the clay too much the clay may look like a muddy mix of colours rather than fairly distinct swirls.  I used a rolling pin covering in clingfilm so the clay didn't stain the wooden rolling pin. 

Step Five: Use a cookie cutter in a circular shape (or any shape you want) or use a mini tart mould as I did to get a scalloped edge to the dish. For an extra detail, I used a large marker lid and cut out three small circles from the excess clay as decoration and for rings to hang from; press the circles gently onto the flat clay disc. 

Step Six: Heat the oven to the guidelines stated on the clay packet which for me was 130 degrees celsius. Place the flat clay disc into a oven safe bowl to hold it in a bowl/dish like shape while it bakes and hardens. I used a silicone mould but you can experiment with different contains to see which one gives a nice bowl/dish shape and curve. I baked mine for approx. 30 minutes but it may differ depending on the brand/type of clay you use. 

Step Seven: After the suggested time frame, be careful and take your container out of the oven - don't remove the clay until it has cooled! Once cool remove and there you have your small jewellery dish/bowl. I will be filing/sanding the edges down as they are a little bit messy. You can also use paint made for clay to decorate the dish further.

What do you think of this quick and easy DIY post? What have you been making recently? 

DIY: Easter Bunny Marble Clay Dish + Figurine

Monday, April 06, 2015
Happy Easter! To celebrate I have a cute but super simple DIY idea that you could easily make yourself or with children. I have a similar post coming soon which was inspired by the blog A Beautiful Mess. Today I'm going to show you how to make a cute Easter bunny dish/bowl and a little bunny figurine. 

To make a clay bunny dish + figurine you will need:

- Oven clay (I bought mine from Amazon) 
- A sharp knife
- Paper
- Cocktail sticks
- Rolling Pin
- A small straw (optional)
- A silicone cupcake mould or a oven safe dish/bowl

Step One: First you will need to lay out the paper on a flat surface and tape it down gently so when you peal it off, it won't ruin the surface. I am using a marble effect clay as it has flecks of black and glitter in it but you can just use white if you want - you could also use pink for the ears/nose.

Step Two: Roll out your clay into a flat rectangle approx. 5mm (0.5cm) thick. You could make it a little thicker but if it is too thin then dish won't be as strong or durable and as it is clay it won't be very strong anyway. Rolling out the clay block is difficult! 

Step Three: Use a sharp knife and cut out your bunny's face shape, I made mine quite chubby with short ears. If you make the ears too long or thick then the dish/bowl won't balance on a flat surface easily. I used an extra piece of clay on the other side of the bunny face so the dish will balance - this make take some trial and error. For the eyes, I used a small straw to cut out circles from the excess clay and gently pressed them onto the clay. I also made a X shape for the bunny's mouth but you can make it however you want.

Step Four: There was excess clay left over so I rolled it into a small thick rectangle and cut out some ears, rolled a small circle for the tail and used a knife and cocktail stick to make the mouth and eyes for the bunny. I didn't want to waste the excess clay - you can make the excess into anything you want. 

Step Five: Heat your oven to the guidelines stated on the clay packet. Place the clay into a oven safe bowl to hold it in a bowl/dish shape while it bakes and hardens. I used a silicone cupcake mould as you can see above as it held the face into a small dish/bowl shape but the ears were flat. I baked mine for 30 minutes but it may differ depending on the brand/type of clay you use. 

Step Six: After 30 minutes be careful and take your container out of the oven - don't remove the clay until it has cooled! Once cooled remove and there you have your small bunny dish/bowl and figurine. I will be using a black clay marker to fill in the eyes and mouth when it arrives. You can also use acrylic paint to decorate the dish and figurine further. You can adapt this DIY and make the bunny however you want or it could be a different animal. 


What do you think of this quick and easy Easter inspired DIY post?